
TL;DR:
- Spawn protection in Minecraft creates a square area using a specified radius to prevent non-operators from modifying blocks at spawn, but it does not stop mob griefing or explosions. Proper configuration involves editing server.properties while the server is off and verifying OP status to ensure protection functions correctly. For comprehensive safety, admins should layer vanilla spawn protection with plugins like WorldGuard or GriefPrevention tailored to their server type and build size.
If you've ever joined a fresh Minecraft server and watched a new player accidentally (or intentionally) tear apart the carefully built spawn lobby, you already understand why minecraft spawn protection explained properly is so valuable. Spawn protection is one of the most misunderstood server-side features in vanilla Minecraft. Many players assume it blocks all interactions at spawn, while many admins assume it handles grief prevention on its own. Neither is quite right. This guide covers exactly how spawn protection works, how to configure it, where it falls short, and what you can do to build a genuinely safe spawn area for your players.
Table of Contents
- Key takeaways
- Minecraft spawn protection explained: core mechanics
- How to configure spawn protection on your server
- What spawn protection does not cover
- Choosing the right spawn protection radius for your server
- Going beyond vanilla: plugins for advanced spawn protection
- My honest take after running a 200-player SMP
- See it in action on Gaia Legends SMP
- FAQ
Key takeaways
| Point | Details |
|---|---|
| Default radius creates a 33x33 zone | The default spawn protection radius of 16 produces a square zone covering 33x33 blocks around world spawn. |
| Setting value to 0 disables protection | In server.properties, a spawn-protection value of 0 turns the feature completely off regardless of OP status. |
| Operators bypass all spawn protection | Any player with OP permissions can freely build and break inside the protected zone at all times. |
| Vanilla protection has real gaps | Spawn protection does not stop mob griefing, explosions, pistons, or most non-block interactions. |
| Plugins fill the gaps vanilla cannot | Tools like WorldGuard give admins permission flags and region controls that vanilla spawn protection cannot match. |
Minecraft spawn protection explained: core mechanics
Spawn protection is a server-side mechanic built into vanilla Minecraft. Its job is simple: prevent non-operator players from placing or breaking blocks within a defined square area centered on the world spawn point. It does not affect players in singleplayer mode. It only activates on multiplayer servers, making it a key first line of defense for anyone running a public or community server.
The geometry here matters more than most guides let on. The protected area is not circular. It is a square, and its size follows a specific formula. The protected area size is calculated as (radius × 2) + 1, measured in blocks per side. So the default radius of 16 produces a zone that is 33 blocks wide and 33 blocks long, centered directly on your world spawn coordinates.
Here is a quick reference table for the most common radius settings and the resulting zone sizes:
| Radius value | Zone size (blocks) | Typical use case |
|---|---|---|
| 0 | Disabled | Private servers, trusted players only |
| 8 | 17x17 | Small survival servers |
| 16 (default) | 33x33 | Standard public servers |
| 32 | 65x65 | Large lobbies, PvP hubs |
| 64 | 129x129 | Massive spawn areas with complex builds |
Operators are exempt from every restriction inside the protected zone. They can place, break, and interact with anything there without limitation. Regular players, on the other hand, cannot break a single block or place one down within the radius. That restriction is the heart of understanding spawn protection for servers running with a mixed player base.
The main goal of spawn protection is to stop new players from griefing or destroying critical spawn structures the moment they join. Think about how many servers have an elaborate welcome hub, a rules board, or a quest NPC area right at spawn. Without protection, one player with a pickaxe and a bad attitude could dismantle it in seconds.
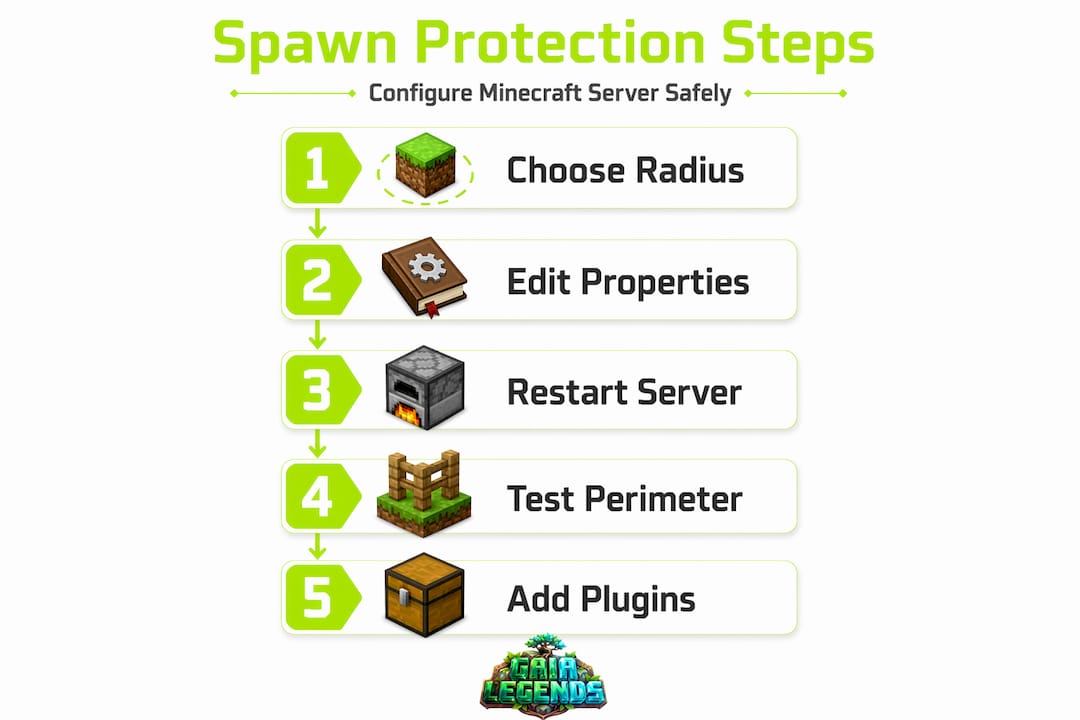
How to configure spawn protection on your server
Configuring spawn protection is straightforward, but the steps need to happen in the right order. Doing it wrong is one of the most common mistakes new admins make, and it can leave your server unprotected even when you think the setting is active.
Follow these steps to get it right:
- Stop your server completely. Do not edit server.properties while the server is running. Editing while the server runs risks your changes being overwritten when the server saves its own configuration. Always stop first.
- Locate server.properties. This file sits in the root directory of your server folder. Open it with any plain text editor. Notepad, Nano, or VS Code all work fine.
- Find the spawn-protection line. It looks like this: "spawn-protection=16`. The number to the right of the equals sign is the radius in blocks.
- Set your desired radius. Replace the number with your chosen radius value. Setting the value to 0 disables spawn protection entirely. Any positive integer activates it at that radius.
- Save the file and restart the server. The change will not take effect until the server fully restarts. A simple reload command is not enough.
- Verify at least one OP exists. This step surprises many new admins. If your server has no operators, spawn protection is inactive regardless of the number you set in server.properties.
The area formula is worth memorizing if you manage a server regularly. Want a spawn zone that covers 49x49 blocks? Set the radius to 24, because (24 × 2) + 1 = 49. Want exactly a 65x65 block coverage for a large hub? Set the radius to 32. This formula-based approach lets you design your spawn build first and then calculate the exact radius you need to cover it.
Pro Tip: Before setting your radius, stand at your world spawn coordinates and map out the furthest corner of your spawn build. Use the F3 debug screen to check coordinates. Then calculate the radius needed to cover that distance in all four directions. This way, your protection zone matches your actual build instead of leaving corners exposed.

Example scenario: you have built a spawn hub that extends 20 blocks in every direction from spawn. Your minimum radius is 20, giving you a 41x41 protected zone. Setting it to 24 gives you a comfortable buffer of 4 extra blocks on each side, which is smart because players often loiter just outside protected areas.
What spawn protection does not cover
Here is where a lot of admins get caught off guard. Spawn protection handles block placement and block breaking. That is it. The list of things it does not handle is longer, and understanding those gaps is just as important as understanding spawn protection for servers.
What vanilla spawn protection does not protect against:
- Mob griefing. Creeper explosions, enderman block theft, and wither attacks can all damage your spawn area freely. Spawn protection does not suppress mob behavior.
- Explosion damage. TNT detonated outside the protected zone can still deal blast damage to blocks inside it. The block-breaking restriction applies to players, not physics.
- Piston activation. A player can set up a piston mechanism just outside the protected zone and use it to push blocks into or through the protected area.
- Container interactions. In most server versions, players can still open chests, barrels, and other containers inside the protected zone even if they cannot break them.
- Non-block interactions. Hitting mobs, trading with villagers, and using items like flint and steel near the border are generally not blocked.
Spawn protection automatically disables if no operators are present on the server. New server owners who skip the /op command for themselves often discover their spawn protection is completely inactive. This is one of the quietest and most frustrating bugs to track down.
Pro Tip: After any major server reset or world change, always run /op [yourusername] before opening the server to players. Then test spawn protection yourself by temporarily logging in on a non-OP account and trying to break a block at spawn. If you can break it, something in your setup is misconfigured.
Because spawn protection only affects block breaking and placing, admins who want full spawn safety absolutely need to supplement it with plugins. Vanilla spawn protection is a starting point, not a complete solution.
Choosing the right spawn protection radius for your server
There is no one-size-fits-all answer here. The right radius depends on your server type, player base, and the size of your spawn build. Here are four practical scenarios to guide your decision:
- Public PvP servers. Go with a larger radius, typically 32 or higher. Public PvP servers attract competitive players who will test every boundary. A larger spawn protection area keeps the lobby and waiting areas intact and gives new players a neutral zone before they enter the combat area.
- Survival SMP servers. A smaller radius between 8 and 16 works well here. Players on survival servers want the freedom to build near spawn, and an overly large protected zone can block prime real estate for early game progression. Match the radius to your actual spawn build size.
- Private servers with trusted friends. Consider setting spawn-protection to 0. When your player list is five people who all know each other, the overhead of a protected zone adds friction without real benefit. Trust your players and give them full freedom.
- MMORPG or hub-style servers. Use a radius that fully covers your lobby, shops, NPC areas, and event boards, plus a buffer of 10 to 15 blocks. On these servers, the spawn area is functional infrastructure, not decorative. Protecting it is protecting your server economy.
"The spawn area sets the tone for everything that follows. Players who arrive at a broken, griefed spawn will leave before they ever see your best content. Treat spawn protection as an investment in first impressions." — General server admin wisdom echoed across Minecraft communities
Incremental testing is your friend. Set a radius, restart, and walk the perimeter of your spawn build on a non-OP account. Confirm the corners are covered. Adjust the radius up or down by increments of 4 to 8 blocks until you land on the right fit. Never assume the math is correct without testing it in-game.
Going beyond vanilla: plugins for advanced spawn protection
Vanilla spawn protection does its job within a narrow scope. For most public or community servers, that scope is not wide enough. Servers needing advanced land management should use dedicated plugins that give admins precise, layered control over what players can do at spawn.
Here is how the most popular options compare:
| Protection tool | Block protection | Mob griefing control | Container access control | Per-player permissions |
|---|---|---|---|---|
| Vanilla spawn protection | Yes | No | No (version-dependent) | No (OP vs. non-OP only) |
| WorldGuard | Yes | Yes | Yes | Yes |
| GriefPrevention | Yes | Yes | Yes | Yes (claim-based) |
| Land claim mods | Yes | Configurable | Configurable | Yes |
WorldGuard is the most widely used plugin for this purpose. It lets you define named regions, assign permission flags to them, and control everything from block breaking to explosion damage to PvP status within those regions. You can make your spawn region completely explosion-proof, prevent mob spawning inside it, and still allow players to trade with villagers, all from a config file.
GriefPrevention takes a different approach, giving players the ability to claim their own land with a golden shovel. For spawn protection specifically, an admin can pre-claim the spawn area and lock it down with admin-level permissions that regular players cannot override.
For server admins who want to check out hosting options that support these plugins out of the box, Gaialegends has a detailed breakdown of the best server hosting for mods available in 2026. If you want to explore which multiplayer mods pair well with region protection tools, the top multiplayer mods guide at Gaialegends is also worth your time.
The practical advice is this: use vanilla spawn protection as your baseline and layer a plugin like WorldGuard on top. The two work together without conflict. Vanilla handles the basic block restriction while WorldGuard covers the gaps.
My honest take after running a 200-player SMP
I've been managing the Gaia Legends SMP for long enough to have strong opinions about this. When we first launched the server, I set spawn-protection to 16, assumed everything was covered, and moved on. Within the first week, a creeper explosion took out a section of our spawn market stalls. Vanilla spawn protection did exactly nothing to stop it.
What I've learned is that vanilla spawn protection is genuinely useful for what it is. It stops casual griefing from new players who join and immediately start punching walls. That matters, especially during the first hour a server is live. But treating it as a complete solution is how you end up with a destroyed spawn and frustrated players.
The real mistake I see admins make isn't skipping plugins. It's not testing their protection setup before going public. I've seen servers where the admin forgot to OP themselves, so spawn-protection was effectively off from day one. I've seen others where the protected radius was 16 but the spawn build extended 25 blocks in one direction, leaving an entire wing of the hub exposed.
My recommendation: set your radius, test it on a non-OP account, add WorldGuard or GriefPrevention on top, and then test again. Two layers of verification catches what one layer misses. On a 200-player server, the cost of a griefed spawn is measured in player trust, not just blocks. You won't get that back by rolling the server back.
Spawn protection is a tool in the toolbox. It's a good one. But you wouldn't build a house with just a hammer.
— Gaia
See it in action on Gaia Legends SMP
If reading about spawn protection has you thinking about how a well-managed server actually feels to play on, come experience it firsthand. The Gaia Legends SMP runs a full suite of region protections, a player-driven economy, and a spawn hub that has stayed intact through hundreds of sessions.

At Gaialegends, we build every guide from real server experience, not theory. Whether you want to build a thriving community server from the ground up or sharpen your existing setup, we have practical resources ready for you. Our team publishes five in-depth Minecraft guides every day, covering everything from spawn mechanics to boss encounters to build design. If you're ready to stop guessing and start running a server that players stick around for, Gaialegends is the place to start. Jump in, explore the guides, and see what a properly protected spawn feels like from the player side.
FAQ
What does spawn protection do in Minecraft?
Spawn protection creates a square zone around the world spawn point where non-operator players cannot place or break blocks. The default radius is 16, producing a 33x33 block protected area.
How do I enable or disable spawn protection?
Open server.properties, find the spawn-protection line, and set the value to your desired radius. Setting the value to 0 disables it completely. Always stop the server before editing and restart it after saving.
Why isn't my spawn protection working?
The most common reason is that no operators exist on the server. Spawn protection becomes inactive when there are zero OPs, regardless of the radius setting in server.properties. Run /op [yourusername] to fix this.
Does spawn protection stop creepers and TNT?
No. Spawn protection only restricts player block placement and breaking. Mob griefing and explosions are not blocked by vanilla spawn protection. Use a plugin like WorldGuard to add those protections.
What spawn protection radius should I use?
It depends on your server type. Public PvP servers benefit from a radius of 32 or higher. Survival SMP servers work well with a radius of 8 to 16. Private servers with trusted players can safely set the value to 0.